Connecting…
OFFLINE
Laser PC …
Result photos (GPS / EXIF location data removed), videos and the burn profile (settings) of every published project — JSON, a plain-text LightBurn settings sheet, and a LightBurn library file (.clb, check the values after importing).
This camera watches a ComMarker B4 60W MOPA fiber laser (JCZ controller, LightBurn). Its settings are published as an open index: 93 settings across 17 materials, 1 verified run with recorded results. Library entries are labelled as unverified starting settings.
Latest verified run: Black anodized aluminum business cards — Good, crisp white marks (manual-height result). First try at 80% power was way too hot. Image layer: Jarvis dither ~400 DPI, 12% power (max 20), 1500 mm/s, 50 kHz, 1 pass. Text/border: fill, 12% power (max 20), 1500 mm/s, 50 kHz, 0.045 mm line interval, 1 pass. (12% · 1500 mm/s · 50 kHz · 1 pass)
Full settings index → · Projects → · Tools → · JSON · CSV · by Henry Elsner (Hank) III
Custom build workup moved off the live view: Raspberry Pi + Pico control, overhead camera, Z-axis stepper, BOM, price list, wiring and schematics.
BOM Prices Schematic / wiring Z-axis Camera Pi control Original /workup/
The B4's built-in Z motor, lead screw and top hand knob move the head, but there is no position readout, no go-to height, and no repeatable defocus. This project counts the existing lead screw with a 600 PPR quadrature encoder on the screw / top-knob shaft — read by a Raspberry Pi Pico (2,400 counts/rev, position stored in flash, homing to a column sensor) — and drives the machine's own +/− buttons through isolated relays, so the original buttons and knob keep working. Caliper a part, enter its height, and the head goes to focus height minus part thickness; a preset bank per lens (110 / 200) stores the small defocus offsets MOPA colour marking needs, so colours become repeatable. The screw lead is still unknown and unmeasured — calibration comes first, and the full write-up is honest about what screw-counting can and cannot see.
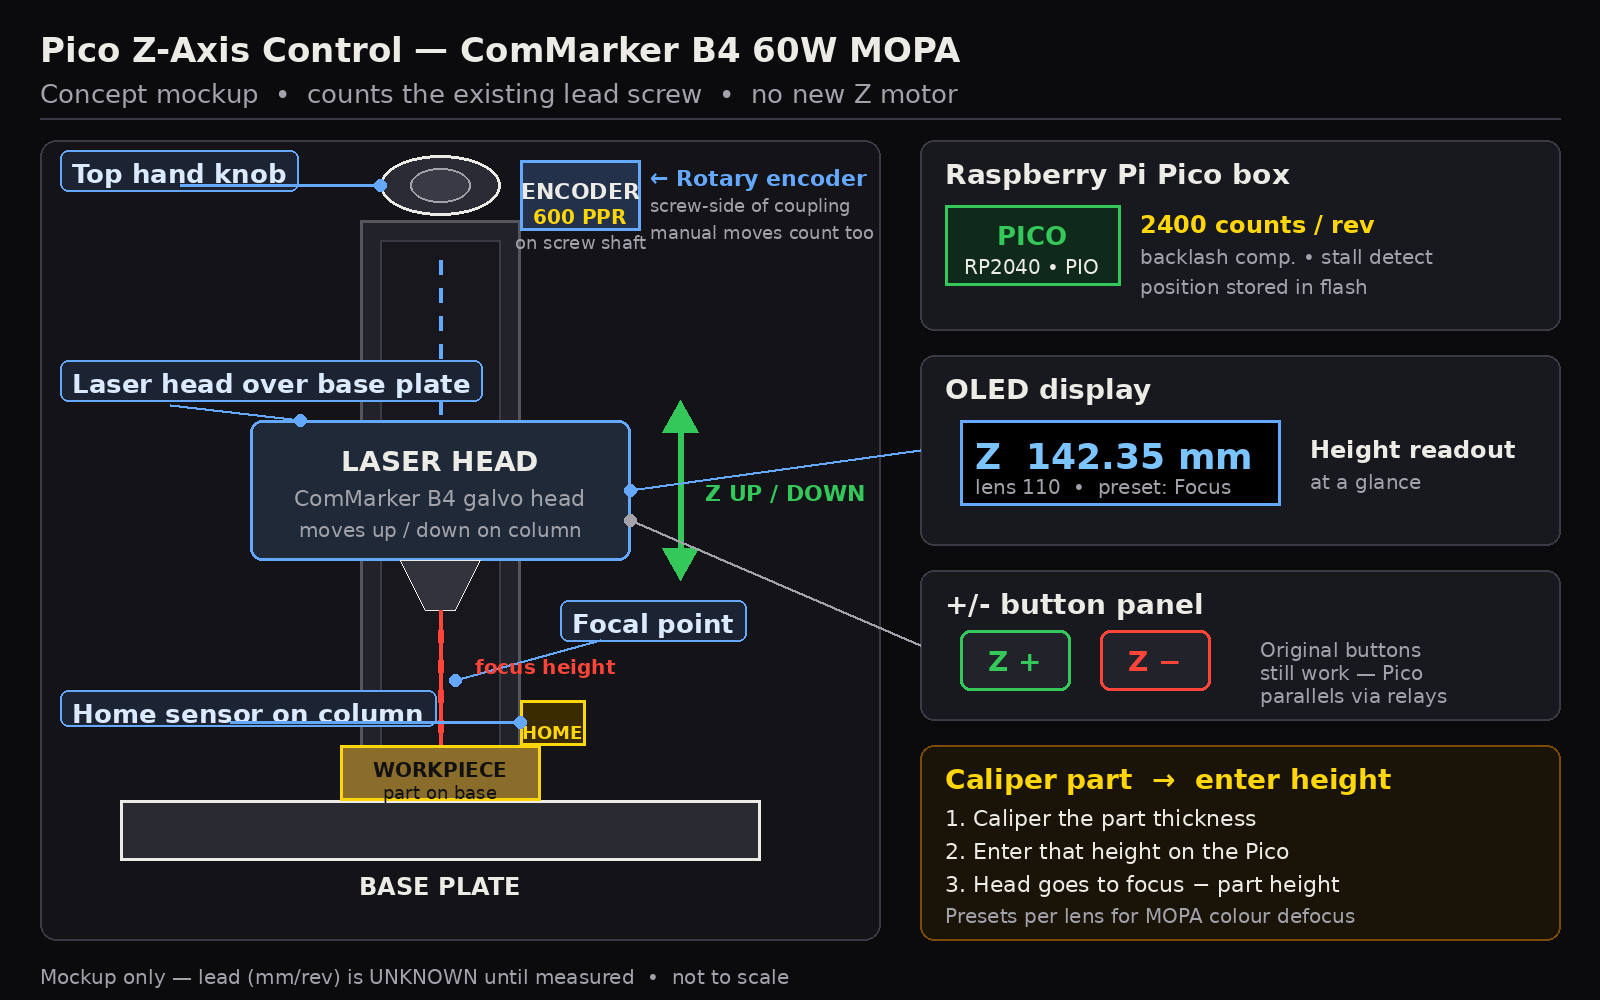
Open the Pico Z-Axis project → · concept, workflow, honest accuracy notes, calibration steps, status and rough BOM (~$65–100)
MeerK40t galvo calibration for the ComMarker B4 60W MOPA (JCZ, 110 mm lens) on black paper: lens size, .cor correction table, flip/swap flags, scan analysis and downloadable job files.
Public lessons for the ComMarker B4 60W MOPA. Overview · All lessons · lessons.md · index.json
Laser Bot Operator Handbook (read first) — Laser Bot Operator Handbook (read first) · raw .md
Start with the Laser Bot Operator Handbook (read first) · MOPA colour knowledge (full notes) · HTML · raw .md
Machine: ComMarker B4 60 W MOPA, 110 mm lens, LightBurn 1.7. Material: 24.5 mm polished stainless coins.
Oxide-film interference; thickness sets colour (straw/gold, brown, purple, blue, then 2nd order pale gold, red/magenta, green, then grey/black). Main control: energy density E = W/(speed x interval) J/mm², W = power% x 60 W; crosshatch and passes multiply dose. Pulse width and frequency set pulse energy (W/f) and peak power; longer pulses run warmer. High pulse energy or slow high E causes sparks/burning. Large fills run hotter than small test cells.
Note: big areas came out much paler than the small test cells (large fills run hotter). The purple vs slate-blue mapping could be swapped (medium-low confidence).
Scaling: halve power % of a 30 W recipe for 60 W; 110 mm lens has a smaller spot, so start about x0.8 and sweep.
F1 E sweep 0.5-16, 80 ns, 1 pass. F2 same, 2 passes, E 0.5-8. F3 E 0.5-16, 60 ns, 230 kHz. F4 forum-red geometry, E 2.5-16, 1 and 2 passes. F5 pulse width 2-200 ns. F6 frequency 30-800 kHz at 60/200 ns. F7 200/350/500 ns warm/gold plus published gold and green. F8 verified colours at x0.7/1/1.4/2 plus published reds. About 21 min total. Results get photographed under fixed white light and fitted to colour = f(dose, ns, f).