ComMarker B4 upgrade: motorized Z, fixed overhead camera, Raspberry Pi + Pico control
Recommendation in one paragraph
Split the jobs. A Raspberry Pi 5 becomes the always-on “laser-io” box. It runs the overhead Camera Module 3 (MediaMTX, streaming to laserview), a small Z/relay/status API, and the tunnel to laserview. A Raspberry Pi Pico (one of the ones you already have) handles the real-time side: a TMC2209 drives a NEMA17 on the Z crank, and the Pico reads the home/limit switches, probe, E-stop, door and ARM-key contacts and switches the fume-extractor relay. The Pi talks to it over USB serial. LightBurn has to stay on x86. There is no ARM build, and 1.7.08 is the last Linux release. Keep it on the ThinkPad for now, and later move it to a small x86 mini PC. Once everything else works, you can try MeerK40t + balor (open source, has Pi64 builds, supports BJJCZ boards and MOPA pulse width) as a headless galvo driver on the Pi. A hardwired E-stop + ARM key chain powers the laser and the Z motor, and no software can close it. The web can never fire the laser unless someone at the machine has armed it.
1. Goals & constraints
- Motorized Z: a stepper on the Z column so focus height is set by numbers ("material is 3.2 mm thick" → head moves), repeatable to well under the depth of focus. Manual override stays possible.
- Built-in camera electronics: a camera fixed over the ~110 × 110 mm field for targeting, calibration and the live laserview stream. It replaces the laptop webcam.
- Off the laptop: camera and machine I/O move to a dedicated Raspberry Pi (Pi 5 preferred, Pi 4 acceptable).
- Use a Pico where it fits: real-time step generation, switches, interlock monitoring and relays, over USB serial to the Pi. You solder and can build simple boards, so the design uses through-hole or module parts on perfboard (or an Adafruit Pico terminal-block board if you'd rather skip soldering).
- Never auto-fire. Software may move Z, toggle the camera and switch the exhaust. Emission always needs a person at the machine (see §13).
2. Can a Raspberry Pi drive the galvo controller?
Short answer: not with LightBurn. With open-source software, yes, experimentally.
| Option | Status (checked 2026-09-27) | Verdict |
|---|---|---|
| LightBurn native on Pi (ARM64 Linux) | Doesn't exist. LightBurn’s install docs say 1.7 is the last version compatible with Linux (1.7.08 is the final Linux download), and 2.x supports only Windows 10/11 and macOS. LightBurn’s Linux developer said on their forum that an ARM build is blocked because they depend on libraries that have no ARM builds. | ❌ Not possible |
| LightBurn x86 under Box64 emulation on a Pi | Community proofs of concept on the LightBurn forum. Unsupported and fragile, and it would also have to pass the galvo's libusb traffic through emulation. | ❌ Don't build a machine on it |
| Windows 11 on ARM on a Pi, running LightBurn x64 | LightBurn supports Windows-on-ARM, but its USB laser drivers have to be installed manually. Windows on a Pi itself is unofficial. Slow and brittle. | ❌ Not recommended |
| MeerK40t + balor driver on the Pi | Open source (Python). Balor reverse-engineers the BJJCZ “LMC” boards that EZCAD2 drives (USB 9588:9899). MeerK40t ships MeerK40t_Pi64.tar in release 0.9.8100 (Aug 2025), and PyPI has 0.9.9100. It has galvo ops with MOPA pulse width (1–250 ns), frequency, delays, .cor correction files and red-light framing. It does not have LightBurn’s material library, workflow or camera tools. | ⚠️ Viable Phase 3 experiment for headless “run this saved job”. Keep LightBurn for design. |
| LightBurn on a small x86 box (ThinkPad now, mini PC later) | Works today. Ubuntu + 1.7.08 keeps your current license and workflow. Windows 11 + LightBurn 2.x gets updates (if your license’s update window allows it) and the 2.1 camera system with IP/network camera support. | ✅ Recommended for the galvo USB |
Only one program can own the galvo USB at a time. If you try MeerK40t on the Pi, move the USB cable (or use a manual USB 2.0 switch) and never have both connected.
3. Recommended architecture
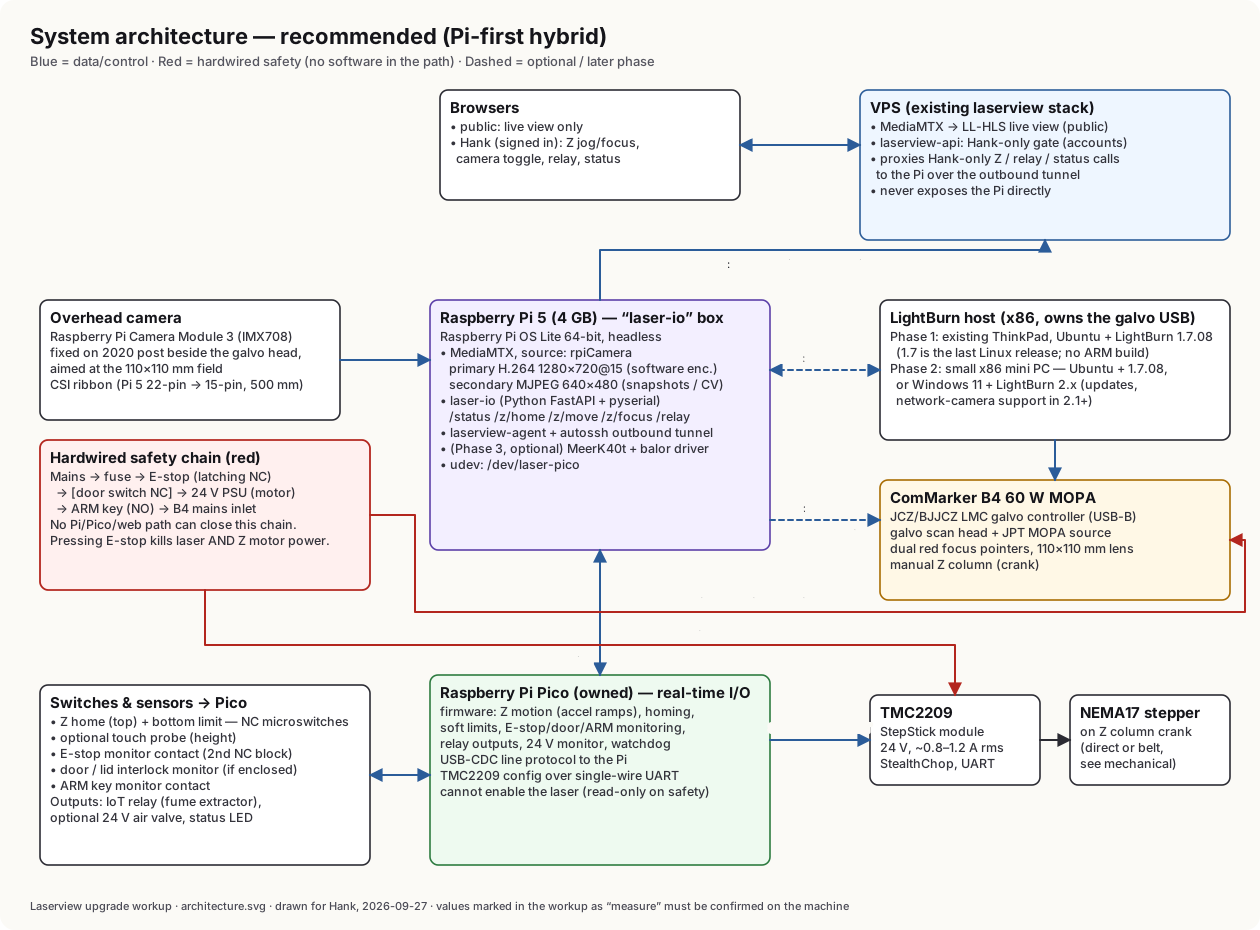
Raspberry Pi 5 (“laser-io”)
- Raspberry Pi OS Lite 64-bit (Bookworm or Trixie), headless, wired Ethernet.
- MediaMTX with
source: rpiCamera. Primary H.264 stream for laserview, plus a secondary MJPEG stream for snapshots and vision. - laser-io: a small Python service (FastAPI + pyserial) that owns
/dev/laser-picoand exposes Z, relay and status endpoints. - laserview agent + outbound SSH tunnel (same pattern as the laptop today). No inbound ports.
- Pi 5 has no hardware H.264 encoder. MediaMTX falls back to
softwareH264, and 1280×720 at 15 fps is light work for a Pi 5. A Pi 4 has the hardware encoder if you already own one.
Pico (real-time I/O)
- Step pulses with acceleration ramps, homing, soft limits and a motion watchdog.
- Configures the TMC2209 over single-wire UART (current, microsteps, StealthChop).
- Reads home/bottom limit, probe, E-stop, door and ARM contacts (NC wiring = fail-safe).
- Drives the exhaust relay, an optional air valve and a status LED, and monitors 24 V.
- Read-only on safety. It can report an E-stop but can never enable the laser.
Phases
- Phase 1: Pi 5 + camera replaces the laptop webcam. Pico + Z drive + switches + E-stop/ARM chain go in. LightBurn stays on the ThinkPad, and laserview gets Hank-only Z controls.
- Phase 2: Camera calibration (lens + homography) and a targeting overlay on laserview. Camera-based height check with the red pointers. Optional touch probe.
- Phase 3 (optional): An x86 mini PC replaces the ThinkPad as LightBurn host, or you try MeerK40t/balor on the Pi for headless saved jobs. Keep LightBurn for design either way.
4. Motorized Z axis & auto-focus
Motor sizing (fill in with your measurements)
Required motor torque: T_motor = (F_crank × r_handle) / reduction × 2, which includes a 2× safety factor. Measure the pull force F with a luggage scale at the handle radius r while cranking up M4. Example: 15 N at 40 mm = 0.6 N·m, which is too much for a direct-drive NEMA17 (about 0.59 N·m holding and well under half that usable at speed). Use a 3:1 belt (0.4 N·m at the motor, still marginal) or a 5:1 planetary NEMA17 (17HS19-1684S-PG5, ~$29). If the crank turns easily (≤ 0.15 N·m), direct-drive a plain 17HS19-2004S1.
| Quantity | Formula | Example |
|---|---|---|
| Travel per crank turn | measure over 10 turns M3 | assume 2 mm/rev (unknown until measured) |
| Steps per mm | 200 × µsteps × reduction / (mm per crank rev) | 200 × 16 × 1 / 2 = 1600 steps/mm (0.6 µm/step) |
| Speed | motor rps × mm/rev / reduction | 3 rps × 2 / 1 = 6 mm/s. Full travel in seconds. |
| Required accuracy | depth of focus of the 110 mm lens (roughly ±0.5 mm; confirm with a focus test) | resolution and repeatability are 100× better than needed. Backlash is the real error, so always approach the target from the same direction. |
- Homing: an NC roller microswitch at the top of travel (Z home) and a second at the bottom as a hard limit. Home at startup and after any E-stop. Z coordinate = height of the lens bottom above the bed, calibrated once by jogging to perfect focus on a known surface.
- Focus model:
Z_target = focus_distance(lens) + material_thickness + user_offset.focus_distanceis the number ComMarker writes on the machine or manual (lens bottom to work surface) M5. Store one entry per lens (110 and 200 mm). - Back-drive: check whether the head drifts down when you let go of the crank M7. If it does, keep the driver enabled at a reduced hold current (TMC2209
IHOLD). If it doesn't (trapezoidal screws are usually self-locking), the driver can be disabled at rest for silence. - Manual override: the belt option keeps a knob on the crank. With direct drive, use a dual-shaft motor or turn the knob only when the driver is disabled (“Z free” button).
Auto-focus: three levels
- Enter thickness (no hardware): type or pick the material thickness and the Pi moves Z. Covers 90 % of jobs.
- Camera + red pointers (no extra hardware): the B4’s two red pointers cross at focus. The overhead camera finds both red dots (red-channel blob detection on the MJPEG snapshot), and their separation is proportional to the height error. Calibrate once by stepping Z through ±5 mm and fitting separation against ΔZ. Then “Auto-focus” means measure, move, and verify the dots coincide. Check whether the pointers can be switched on without firing M12.
- Touch probe (optional): a pin probe (e.g. BIQU MicroProbe, $25.99) or a microswitch on a spring plunger beside the lens. Z moves down slowly until it triggers, then Z = trigger + offset. Probe with the laser disarmed, and retract before a job.
5. Overhead camera
- Camera: Raspberry Pi Camera Module 3 standard (IMX708, 12 MP, autofocus, 66° × 41°, $29.25). The standard lens has less distortion than the 120° Wide ($38.50). Pick the Wide only if the camera has to sit very close. Avoid NoIR versions: the IR-cut filter helps with the 1064 nm beam's glare.
- Mounting: fix it to the base on a 2020 extrusion post, not to the head. Put it beside the head, outside the beam cone, tilted about 20–30° toward the field center (see mechanical.svg). Because it doesn't move with Z, one calibration holds, and the Pi reprojects for the known material height. Put a cheap sacrificial window (thin glass or polycarbonate) in front of the lens to keep fume deposits off.
- Coverage: at ~220 mm slant distance the standard lens sees ~290 × 165 mm, so the 110 mm field fits the short axis with margin. That's ~0.06 mm/px on full-resolution stills and ~0.22 mm/px on the 720p stream.
- Focus lock: set autofocus once, then lock it (
rpiCameraAfMode: manual,rpiCameraLensPosition) so the calibration doesn't drift. - Lighting: a small diffuse white LED strip on the post gives consistent exposure. Fix the exposure and white balance after setup.
- Calibration: (1) lens calibration with a printed checkerboard (OpenCV
calibrateCamera), (2) alignment: the laser marks a 3 × 3 grid of crosses on anodized aluminum or card, the Pi detects them and fits a homography from image to galvo coordinates, (3) apply a height correction from the known material thickness. LightBurn 2.1+ (Windows/macOS) can instead use the Pi’s network stream directly through its new camera system. On Linux 1.7.08 that isn't available, so targeting happens on laserview plus red-dot framing. - Cable: Pi 5 uses 22-pin FFC. A 500 mm 22→15-pin cable costs $2.50. Route it away from the galvo and laser-source power leads. If the Pi has to sit more than ~0.5–1 m away, use a USB UVC camera instead (MediaMTX “generic webcam” path).
6. Wiring diagram & schematic
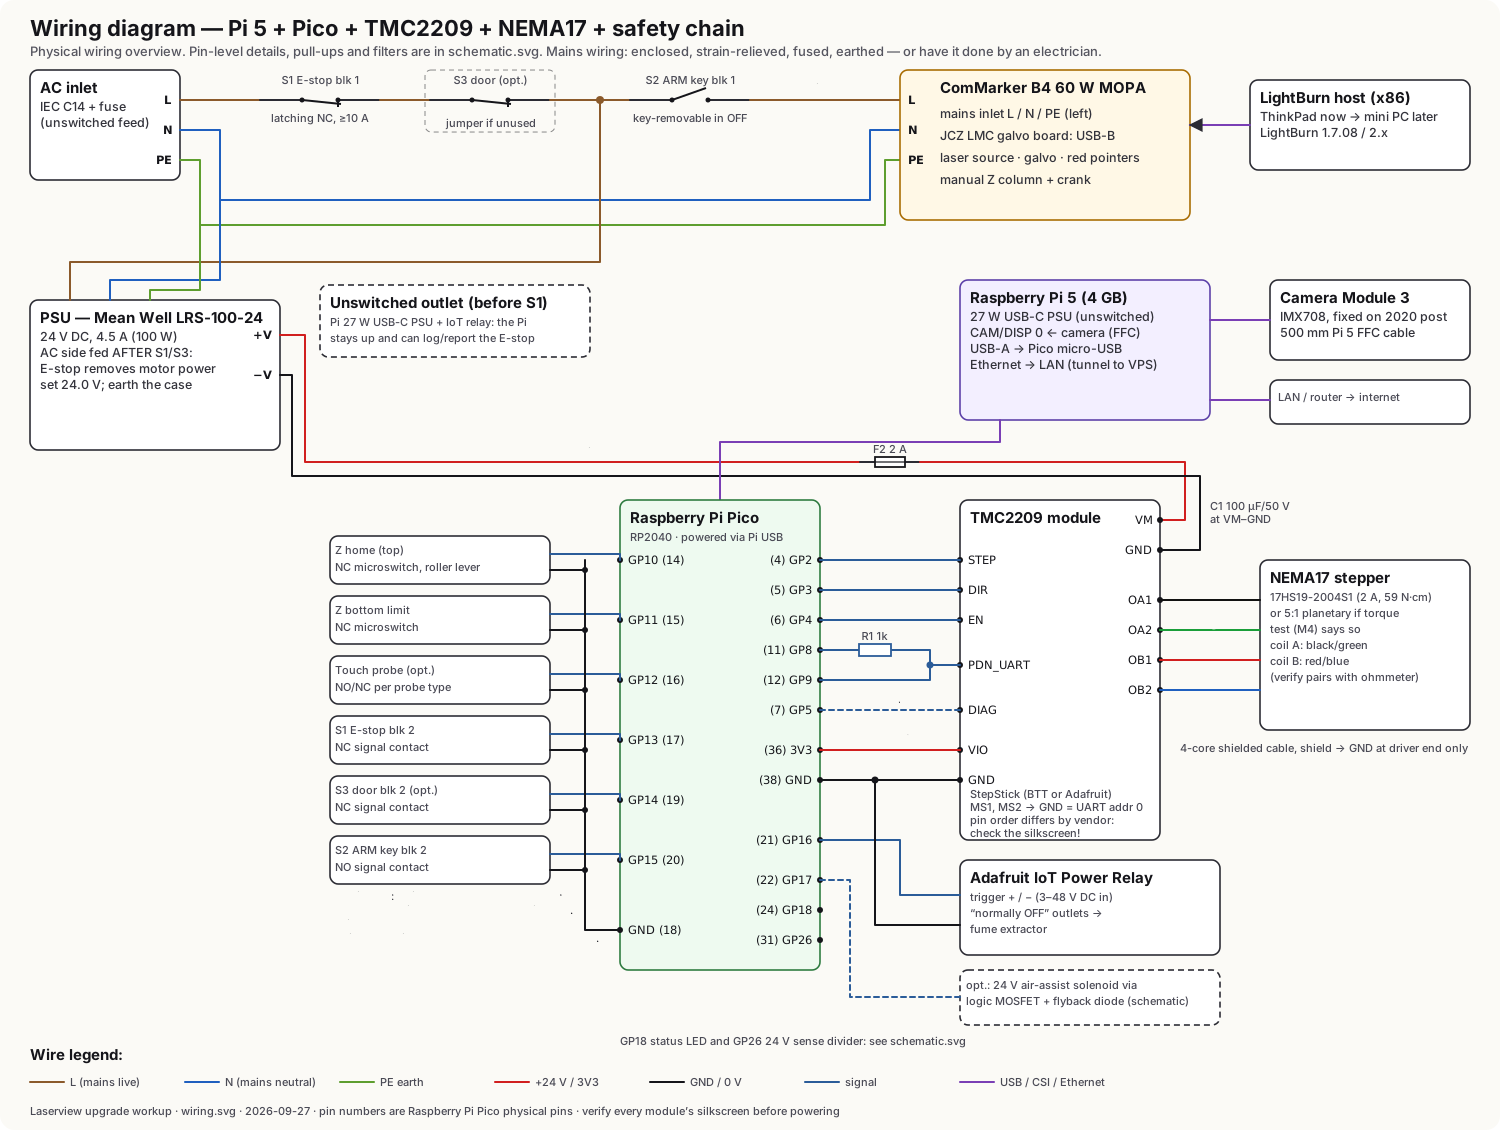
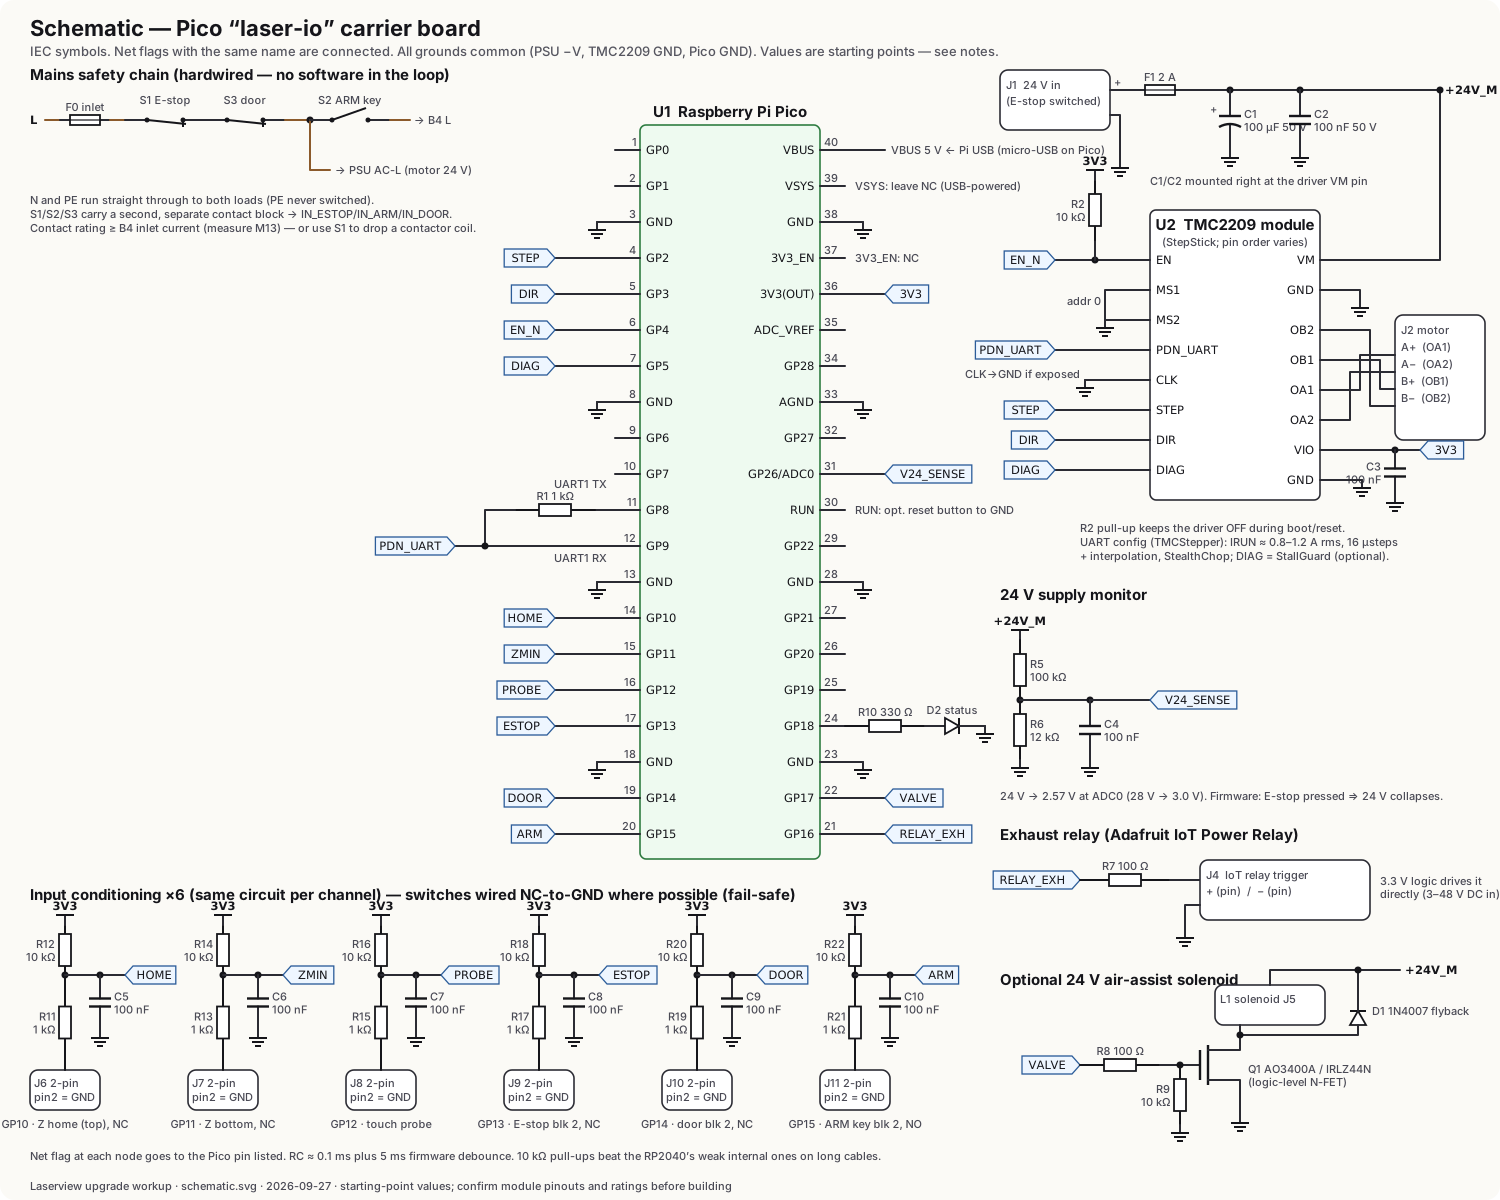
Pico pin map
| Pico pin | GPIO | Net | Connects to | Notes |
|---|---|---|---|---|
| 4 | GP2 | STEP | TMC2209 STEP | PIO or hardware-timed pulses |
| 5 | GP3 | DIR | TMC2209 DIR | |
| 6 | GP4 | EN_N | TMC2209 EN | 10 kΩ pull-up to 3V3 = driver off at boot |
| 7 | GP5 | DIAG | TMC2209 DIAG | optional StallGuard sanity check |
| 11 / 12 | GP8 / GP9 | PDN_UART | TMC2209 PDN_UART | UART1 TX via 1 kΩ, RX direct; MS1 = MS2 = GND → address 0 |
| 14 | GP10 | HOME | Z top switch (NC) | all inputs: 1 kΩ series, 10 kΩ pull-up, 100 nF |
| 15 | GP11 | ZMIN | Z bottom switch (NC) | hard limit |
| 16 | GP12 | PROBE | touch probe | optional |
| 17 | GP13 | ESTOP | E-stop 2nd NC block | HIGH = pressed or wire cut |
| 19 | GP14 | DOOR | door switch 2nd NC block | jumper to GND if no enclosure |
| 20 | GP15 | ARM | ARM key 2nd NO block | LOW = armed |
| 21 | GP16 | RELAY_EXH | IoT Power Relay + | fume extractor |
| 22 | GP17 | VALVE | MOSFET gate (optional) | 24 V air-assist solenoid, with flyback diode |
| 24 | GP18 | LED | status LED via 330 Ω | |
| 31 | GP26/ADC0 | V24_SENSE | 100 k / 12 k divider from +24 V | 24 V → 2.57 V |
| 36 | 3V3(OUT) | 3V3 | TMC2209 VIO, pull-ups | ≤ 300 mA total |
| 40 | VBUS | — | Pi USB | Pico powered and connected over one USB cable |
Grounding: PSU −V, TMC2209 GND and Pico GND are common (through the driver board). Earth the PSU case and the B4 chassis. Use shielded 4-core motor cable with the shield grounded at the driver end only. Put a 100 µF/50 V electrolytic at the driver’s VM pin. Never unplug the motor while the driver is powered.
7. Pico firmware outline
Recommended: Arduino-Pico core (earlephilhower) + TMCStepper (UART config) + AccelStepper or a PIO step generator. These are mature libraries and keep the code small. Alternative: flash Klipper on the Pico and run Klipper + Moonraker on the Pi (manual_stepper, endstops, output_pin, TMC2209 UART are all built in). That's well-proven stepping with almost no firmware to write, but it's more stack than a single Z axis needs.
// laser-io Pico firmware (outline)
setup():
  pinMode(EN_N, OUTPUT); digitalWrite(EN_N, HIGH);   // driver OFF first
  inputs with pull-ups; 5 ms debounce
  Serial (USB CDC) 115200; Serial2 (UART1 GP8/GP9) 115200 → TMCStepper
  tmc.begin(); tmc.rms_current(CFG.run_ma); tmc.microsteps(16);
  tmc.en_spreadCycle(false); tmc.pwm_autoscale(true); tmc.ihold(CFG.hold_pct)
  watchdog_enable(500 ms)
  state = UNHOMED

loop():                           // never blocks
  watchdog_update()
  read_inputs()                   // HOME ZMIN PROBE ESTOP DOOR ARM, V24
  if ESTOP or V24 < 20 V:  stop_now(); EN_N=HIGH; state=ESTOP   // latched until E-stop released AND host sends RESET
  if moving and (ZMIN or (HOME and dir==up)): stop_now(); fault("limit")
  if moving and host_heartbeat_age > 2 s:  stop_now(); fault("host lost")
  stepper.run()                   // accel ramps
  handle_serial_line()
  every 200 ms: emit STATUS if changed

commands (one line in → one JSON line out):
  HELLO                    → {"ok":true,"fw":"lz-1.0","steps_mm":1600}
  STATUS                   → {"z":42.315,"homed":true,"moving":false,"estop":false,
                              "door":true,"armed":false,"probe":false,"lim":[0,0],"v24":24.1,"fault":null}
  HOME                     → up at low speed to HOME, back off 1 mm, re-approach slowly, z := Z_TOP
  MOVE <z_mm> [mm_s]       → absolute; refused unless homed, not ESTOP, inside soft limits;
                              final approach always from above (backlash), then report
  JOG <dz_mm>              → relative, max 10 mm per command
  PROBE [max_mm]           → slow down until PROBE, report z, back off 2 mm
  STOP                     → controlled decel
  FREE / HOLD              → disable / enable driver (manual crank)
  RELAY exh|valve 0|1      → outputs (exhaust stays controllable during E-stop)
  CFG key=value …          → run_ma, hold_pct, steps_mm, soft_min, soft_max, z_top (saved to flash)
  PING                     → heartbeat (host sends every 500 ms while a move is active)
  RESET                    → clear latched fault (only if ESTOP released)

never:  anything that touches laser emission. The Pico reports ARM/ESTOP/DOOR only.
udev (on the Pi) gives it a stable name: SUBSYSTEM=="tty", ATTRS{idVendor}=="2e8a", ATTRS{serial}=="<your-pico-serial>", SYMLINK+="laser-pico".
8. Pi software stack & laserview integration
Camera: MediaMTX with rpiCamera
# /etc/mediamtx/mediamtx.yml (Pi) — excerpt; MediaMTX arm64 release (v1.21.x at time of writing)
rtspAddress: 127.0.0.1:8554        # local only; the tunnel carries the stream
hls: no
webrtc: no
paths:
  cam:
    source: rpiCamera
    rpiCameraWidth: 1280
    rpiCameraHeight: 720
    rpiCameraFPS: 15
    rpiCameraBitrate: 2500000
    rpiCameraAfMode: manual          # lock focus after setup
    rpiCameraLensPosition: 4.5       # dioptres — set from your setup (measure)
    # publish to the laserview server over the tunnel (same as the laptop does today)
    runOnAvailable: ffmpeg -rtsp_transport tcp -i rtsp://127.0.0.1:8554/cam -c copy -f rtsp rtsp://…publisher…@127.0.0.1:<tunnel-port>/laser
    runOnAvailableRestart: yes
  snap:
    source: rpiCamera
    rpiCameraSecondary: true         # MJPEG by default for secondary streams
    rpiCameraWidth: 1536
    rpiCameraHeight: 864
    rpiCameraFPS: 5
    rpiCameraMJPEGQuality: 85
(Older MediaMTX releases call the hook runOnReady. The publisher credential stays in the Pi's env file and never goes into the page or a repo.) Nothing changes on the laserview server: the Pi simply takes over as the publisher of the laser path. The existing on/off toggle keeps working, with the Pi's agent starting and stopping the camera path instead of the laptop's.
laser-io API (FastAPI on the Pi, loopback + LAN only)
| Method | Path | Does | Guards |
|---|---|---|---|
| GET | /status | Pico status + camera + service health | read-only |
| POST | /z/home | home Z | not ESTOP, no job active |
| POST | /z/move {"z_mm":…} | absolute move | homed, soft limits, no job active |
| POST | /z/jog {"dz_mm":…} | relative (≤ 10 mm) | same |
| POST | /z/focus {"lens":"110","material_mm":3.2,"offset_mm":0} | compute and move to focus height | same |
| POST | /z/autofocus | red-dot camera method, or probe if fitted | laser disarmed |
| POST | /z/stop, /z/free | stop / release motor | always allowed |
| POST | /relay/exhaust {"on":true} | fume extractor | always allowed |
| GET | /camera/snapshot.jpg | still from the MJPEG secondary | read-only |
- systemd units on the Pi:
mediamtx.service,laser-io.service(User=laserio, in thedialoutandvideogroups),laserview-agent.service,laserview-tunnel.service(autossh, outbound only). AddRestart=alwaysand a hardware watchdog (dtparam=watchdog=on). - How laserview calls it: browser → laserview API (the existing Hank-only gate: same-origin check + account check) → reverse tunnel → Pi
laser-io. The public page never talks to the Pi, and anonymous users only see the stream. New Hank-only buttons: Home Z, Jog ±0.1/1/10 mm, Material thickness → Focus, Auto-focus, Z free, Exhaust, and a status strip (Z, homed, E-stop, door, ARMED). - “Job active” interlock for Z: the laserview run feature already knows when it started a job. laser-io refuses Z moves while a run is active. As a hardware backstop, check whether the galvo board has a free output you can set during marking and wire it into a spare Pico input (optional, M14).
- Phase 3 option: install MeerK40t (Pi64 build or
pip install meerk40t) plus a udev rule for9588:9899. It can then run saved jobs headless from its console, with the same ARM rules.
9. Mechanical notes
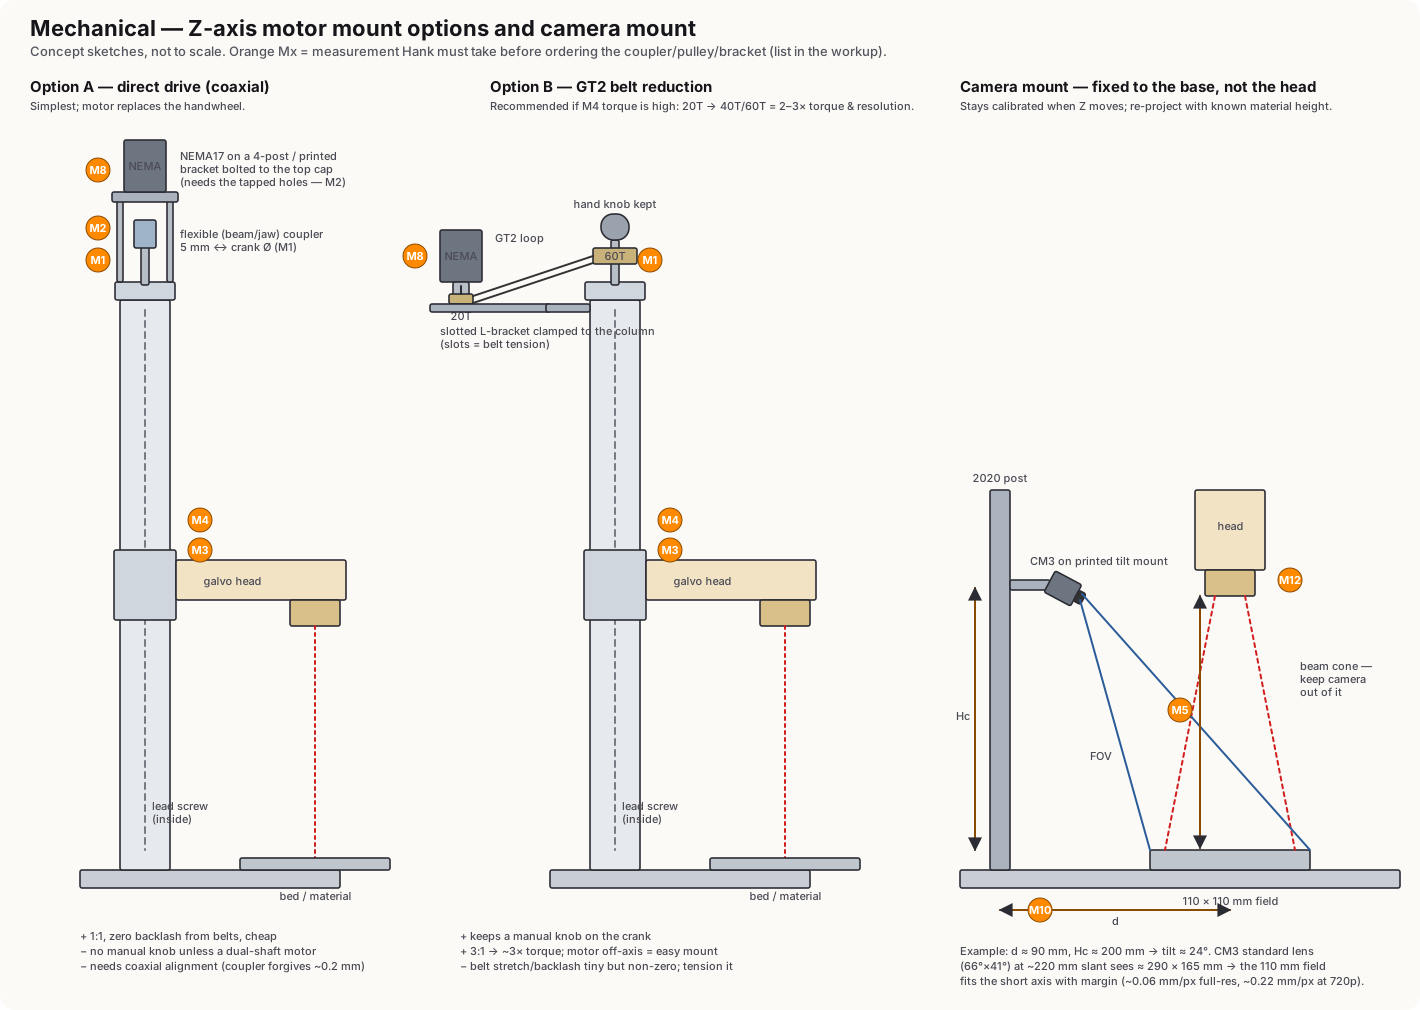
- Option A (direct drive): remove the handwheel. A flexible beam or jaw coupler (5 mm motor side, crank-shaft Ø on the other side) connects to a NEMA17 on a four-standoff or 3D-printed bracket bolted to the column’s top cap. It's the cheapest and has no belt backlash, but it needs coaxial alignment. The coupler forgives only small misalignment.
- Option B (GT2 belt, recommended if torque is high): a 20T pulley on the motor, 40T or 60T on the crank shaft (bore = crank Ø, set screws on the flat), and a closed-loop 6 mm GT2 belt. The motor sits on a slotted L-bracket clamped to the column; the slots set belt tension. You keep a small knob on top for manual turning, and get 2–3× more torque and resolution.
- Bracket material: PETG or ASA printed brackets are fine for a NEMA17 at these loads. Use aluminum plate if the column gets warm or you want it permanent. Don’t drill the column without checking what’s inside (lead screw, wiring for an electric-lift variant).
- Limit switches: roller-lever microswitches on small printed brackets, triggered by the carriage at the top and bottom of travel. Make them adjustable (slotted holes).
- Camera mount: a 2020 post bolted to the base plate (use existing holes or add a clamp plate). Add a short arm, then a printed tilt mount with an M2 or M2.5 hole pattern for Camera Module 3. It must be rigid: any knock means redoing the alignment.
- Electronics box: Pi + Pico board + TMC2209 + PSU in a ventilated enclosure away from the beam, with the E-stop and ARM key on the front where you can reach them from the operator position.
10. Measurements Hank must take
| # | Measure | How | Decides |
|---|---|---|---|
| M1 | Crank shaft diameter, flats/keyway, material | calipers, handwheel removed | coupler / pulley bore |
| M2 | Shaft protrusion length; tapped holes on the column top cap (size, spacing) | calipers, thread gauge | bracket design |
| M3 | Travel per crank turn | mark the handle, 10 turns, measure head travel | steps/mm, speed |
| M4 | Torque to crank UP (top and bottom of travel) | luggage scale at the handle, × handle radius | direct vs 3:1 belt vs 5:1 geared |
| M5 | Focus distance per lens (lens bottom → work surface) and total Z travel | ComMarker’s handwritten value + your own focus test | Z calibration, soft limits |
| M6 | Backlash | dial indicator on the head, reverse direction, note dead angle | approach-direction strategy |
| M7 | Does the head drift down when the crank is released? | observe with the crank free | hold current / brake |
| M8 | Clear space around the crank | measure the envelope (NEMA17 = 42 × 42 × 48 mm + bracket) | Option A vs B |
| M9 | Up/down buttons present (electric lift)? | look at the column and control panel | stepper vs reuse the DC motor |
| M10 | Camera post location: free spot on the base, distance to field center, lens-bottom height at focus | ruler | camera tilt / lens choice |
| M11 | Galvo board USB ID | lsusb on the ThinkPad (expect 9588:9899 for BJJCZ LMC) | MeerK40t / balor compatibility |
| M12 | Red pointers: always on, or switchable? Where are they powered from? | observe, trace the wires | camera auto-focus method |
| M13 | B4 mains current (rating label) | read the label / inlet fuse | E-stop and key contact rating, fuse |
| M14 | Spare galvo-board output for a “marking” signal (optional) | board silkscreen / LightBurn galvo port settings | hardware job-active interlock |
11. Bill of materials
| Part | Qty | Purpose | Example part / link |
|---|---|---|---|
| Compute & camera | |||
| Raspberry Pi 5, 4 GB | 1 | laser-io box: camera, API, tunnel | PiShop SC1111 (Pi 4 4 GB OK: SC0194) |
| Raspberry Pi 27 W USB-C PSU | 1 | Pi power (unswitched outlet) | PiShop SC1158 |
| Official Pi 5 case + fan | 1 | cooling (software H.264 encode) | Adafruit 5816 |
| microSD 64 GB A2 | 1 | OS | Official Raspberry Pi microSD (PiShop) |
| Camera Module 3 (standard) | 1 | fixed overhead camera | Adafruit 5657 (Wide: 5658) |
| Pi 5 camera FFC 22→15-pin, 500 mm | 1 | camera cable | Adafruit 5820 |
| Motion & I/O | |||
| Raspberry Pi Pico | 1 | real-time I/O | owned (spare: Pico 2, PiShop) |
| TMC2209 StepStick driver | 1 | quiet stepper driver, UART config | BTT TMC2209 or Adafruit 6121 |
| NEMA17 stepper 2 A / 59 N·cm | 1 | Z drive (direct / belt) | StepperOnline 17HS19-2004S1 |
| (alt) NEMA17 with 5:1 planetary | (1) | if the crank is stiff (M4) | 17HS19-1684S-PG5 |
| NEMA17 mount | 1 | starting point for the motor bracket | Adafruit 1297 (or printed) |
| Flexible coupler 5 mm → crank Ø | 1 | Option A | Adafruit 1176 (5→8 mm); pick the bore after M1 |
| GT2 20T pulley + 40/60T pulley + closed belt | 1 set | Option B | UltiMachine 20T; large pulley bored to M1 |
| Roller-lever microswitch | 2 | Z home + bottom limit | Adafruit 819 |
| Touch probe (optional) | (1) | measured height | BIQU MicroProbe V2 |
| Pico carrier: perfboard + passives (or terminal-block board) | 1 | board in schematic.svg | DIY, or Adafruit 5095 Pico terminal block |
| Power & safety | |||
| Mean Well LRS-100-24 | 1 | 24 V motor supply (E-stop switched) | TRC Electronics |
| E-stop 22 mm latching, NC ≥10 A (+ 2nd NC block) | 1 | kills laser + motor power | LAY37-01ZS (Newegg); industrial: Siemens 3SU1000-1HB20-0AA0 (RS) |
| ARM key switch 22 mm (NO, key out in OFF) + 2nd contact | 1 | local arming, gates B4 mains | any 22 mm key selector, ZB2-style contact blocks |
| Fused IEC inlet, outlets, enclosure | 1 | E-stop / electronics box | generic |
| Adafruit Controllable Four Outlet Power Relay v2 | 1 | fume extractor on/off, no mains soldering | Adafruit 2935 |
| Mechanical | |||
| 2020 extrusion 610 mm | 1 | camera post | Adafruit 1221 |
| 2020 double corner brace | 2 | post to base / arm | Adafruit 1259 |
| Brackets, M3/M4 screws, T-nuts, filament | — | motor, switch, camera mounts | printed or aluminum plate |
| Optional | |||
| x86 mini PC | (1) | Phase 3 LightBurn host (frees the ThinkPad) | GMKtec NucBox G3S N95 8/256 |
12. Price list (real prices, cited)
| Item | Qty | Vendor (checked 2026-09-27) | Unit | Line |
|---|---|---|---|---|
| Phase 1 core — looked-up prices | ||||
| Raspberry Pi 5 4 GB (SC1111) | 1 | PiShop.us | $110.00 | $110.00 |
| Raspberry Pi 27 W USB-C PSU (SC1158) | 1 | PiShop.us | $12.95 | $12.95 |
| Official Raspberry Pi 5 Case + Fan | 1 | Adafruit #5816 | $12.00 | $12.00 |
| Official Raspberry Pi microSD 64 GB A2 | 1 | PiShop.us | $39.95 | $39.95 |
| Camera Module 3 standard | 1 | Adafruit #5657 (PiShop also $29.25) | $29.25 | $29.25 |
| Pi 5 FPC camera cable 500 mm | 1 | Adafruit #5820 | $2.50 | $2.50 |
| Raspberry Pi Pico | 1 | already owned | $0.00 | $0.00 |
| BTT TMC2209 driver (1 pc) | 1 | biqu.equipment | $7.89 | $7.89 |
| NEMA17 17HS19-2004S1 | 1 | StepperOnline (omc-stepperonline.com) | $9.62 | $9.62 |
| NEMA-17 stepper mount w/ hardware | 1 | Adafruit #1297 | $8.95 | $8.95 |
| Aluminum flex shaft coupler 5→8 mm | 1 | Adafruit #1176 | $4.95 | $4.95 |
| Mean Well LRS-100-24 | 1 | TRC Electronics | $16.48 | $16.48 |
| Micro switch w/ roller lever | 2 | Adafruit #819 | $1.95 | $3.90 |
| 22 mm latching E-stop 1NC (LAY37-01ZS) | 1 | Newegg (listing 297-004Y-01482) | $7.99 | $7.99 |
| Controllable Four Outlet Power Relay v2 | 1 | Adafruit #2935 | $39.95 | $39.95 |
| Slotted aluminum extrusion 2020 × 610 mm | 1 | Adafruit #1221 | $7.50 | $7.50 |
| 2020 double corner brace | 2 | Adafruit #1259 | $1.95 | $3.90 |
| Subtotal — looked-up prices | $317.78 | |||
| Phase 1 core — ESTIMATES (not quotes) | ||||
| 22 mm key selector switch + extra contact blocks (E-stop/key signal) | 1 | ESTIMATE | $10–25 | |
| Passives/connectors: 100 µF 50 V, 100 nF, resistors, JST/screw terminals, 2 A fuse + holder, perfboard | 1 | ESTIMATE | $15–25 | |
| Wire: mains-rated 18 AWG, 22 AWG signal, 4-core shielded motor cable, ferrules, heat-shrink | 1 | ESTIMATE | $10–20 | |
| Enclosure + fused IEC C14 inlet + C13 outlets for the safety box | 1 | ESTIMATE | $20–35 | |
| Bracket material (filament / Al plate), M3/M4 screws, T-nuts | 1 | ESTIMATE | $5–20 | |
| Shipping across ~6 vendors | — | ESTIMATE | $25–50 | |
| Subtotal — estimates | $85–175 | |||
| Phase 1 total (ThinkPad stays LightBurn host) | ≈ $403–493 | |||
| Options — looked-up prices unless marked | ||||
| NEMA17 5:1 planetary 17HS19-1684S-PG5 (replaces the plain motor: +$19.24) | 1 | StepperOnline | $28.86 | +$19.24 |
| GT2 20T pulley, 5 mm bore | 1 | UltiMachine | $11.00 | $11.00 |
| GT2 40/60T pulley bored to crank Ø + closed-loop 6 mm belt | 1 | ESTIMATE | $12–23 | |
| BIQU MicroProbe V2 (touch probe) | 1 | biqu.equipment | $25.99 | $25.99 |
| Adafruit Terminal Block Breakout for Pico (no-solder carrier) | 1 | Adafruit #5095 | $24.95 | $24.95 |
| Camera Module 3 Wide instead of standard | 1 | Adafruit #5658 | $38.50 | +$9.25 |
| Industrial E-stop Siemens 3SU1000-1HB20-0AA0 instead of budget one | 1 | RS Americas (us.rs-online.com listing) | $52.67 | +$44.68 |
| Raspberry Pi 4 4 GB instead of Pi 5 (has HW H.264 encoder) | 1 | PiShop.us | $100.00 | −$10.00 |
| Spare Pico 2 | 1 | PiShop.us | $5.00 | $5.00 |
| x86 mini PC: GMKtec NucBox G3S (N95, 8 GB / 256 GB) | 1 | gmktec.com | $249.99 | $249.99 |
| (comparison) Beelink EQ14 N150 16 GB / 500 GB (pre-order) | — | bee-link.com | $385.00 | — |
| Everything (Phase 1 + geared motor + belt set + probe + mini PC) | ≈ $721–822 | |||
13. Safety
This is a Class 4 laser
- 60 W average, pulsed 1064 nm, invisible. Direct and diffuse reflections from metal can cause permanent eye injury in a fraction of a second, and it can start fires. Wear wavelength-rated eyewear (OD 6+ at 1064 nm) whenever it's armed. Better still, build a light-tight enclosure with 1064 nm-rated viewing windows and an interlocked door. The red pointers are not a safety indication.
- Never auto-fire. No software path in this design can start emission on its own. The ARM key physically powers the B4, the key comes out in OFF, and a person must be at the machine to arm it. Remote “Run” (laserview) is allowed only while ARMED, only with the live camera showing, and only for Hank. The Pi and Pico can report ARM/E-stop/door but cannot close that chain.
- E-stop is hardwired in series with mains to both the laser and the 24 V motor supply. It latches and stays off until someone twists it to reset. Test it before every session. After an E-stop, the firmware requires re-homing and an explicit reset.
- Z moves are refused while a job runs and when not homed, and they stay inside soft limits. Hard limit switches cut motion. Keep fingers out of the crank, belt and carriage pinch points. The motor can back-drive the crank handle if one is still fitted.
- Fumes: metal marking produces metal oxides, and plastics can be toxic (never PVC or vinyl, which release chlorine). Run extraction to outside or through a HEPA + carbon filter. The exhaust relay stays on the unswitched circuit so extraction can continue after an E-stop.
- Mains: all 120 V wiring goes in a closed, earthed, strain-relieved enclosure with a fused inlet. PE is never switched. The E-stop and key contacts must be rated above the B4’s current M13, or have them switch a contactor coil. If you're unsure, have an electrician do the mains box. The IoT relay avoids mains wiring entirely for the exhaust.
- Fire: never leave it running unattended. Keep a CO₂ extinguisher nearby, and keep the work area clear of flammables.
- Camera: keep it out of the beam cone and specular paths. A direct hit will destroy the sensor.
14. Build & test plan
- Take M1–M14. Choose Option A or B and direct-drive vs geared. Order parts.
- Bench-build the Pico board. Flash the firmware. With the motor on the bench, test UART config, current, direction and microsteps, and confirm the driver stays disabled at boot.
- Build the safety box (E-stop, ARM key, door jumper). Verify with a meter that pressing E-stop removes 24 V and B4 mains, that the key gates only the B4, and that the Pico sees each contact.
- Set up the Pi: OS, MediaMTX with the camera, then laser-io. Test
/status, home, and moves from the Pi shell. - Mount the motor and limit switches on the column. Home repeatedly and measure repeatability with a dial indicator (target ≤ 0.02 mm). Calibrate Z_TOP and focus per lens with a focus-ladder test.
- Mount the camera. Lock focus. Do lens calibration and homography, then add the red-dot auto-focus calibration.
- Switch laserview's publisher from the laptop to the Pi. Add the Hank-only Z panel to laserview.
- Optional: set up the mini PC as LightBurn host, and/or run a MeerK40t trial with the galvo USB moved to the Pi (one host at a time).
15. Sources (checked 2026-09-27)
- LightBurn docs, Installing LightBurn: 1.7 is the last Linux-compatible version; OS compatibility table; Windows-on-ARM USB driver limitation.
- LightBurn forum, LightBurn on Pi4 (LightBurn Linux dev: no ARM build due to library dependencies) and Install LightBurn on Raspberry (unsupported; emulation only).
- LightBurn docs, Cameras: 2.1 introduced the new camera system, including IP (network) cameras.
- MeerK40t release 0.9.8100 (Pi64 build), Balor operation help (MOPA pulse width 1–250 ns), balor-meerk40t (USB 9588:9899), Bryce Schroeder’s Balor notes.
- MediaMTX docs, Raspberry Pi Cameras and the reference config (
rpiCameraCodec: auto→ softwareH264 when there's no hardware encoder; secondary MJPEG stream;runOnAvailable). - ComMarker B4 product page (electric lifting on some builds, dual red locators, 110/200 mm lenses) and B4 user manual (focus distance written per machine).
- Vendor product pages for every price in §12 (PiShop.us, Adafruit, biqu.equipment, StepperOnline, TRC Electronics, Newegg, RS Americas, UltiMachine, GMKtec, Beelink).
Engineering workup for Hank · laserview.hankelsner.tech/workup/index.html · 2026-09-27. Diagrams: architecture.svg · wiring.svg · schematic.svg · mechanical.svg. Treat values marked “measure” or ESTIMATE as unconfirmed until checked on the machine or quoted.