Pico Z-Axis Control for the ComMarker B4 60W MOPA
The idea in one paragraph
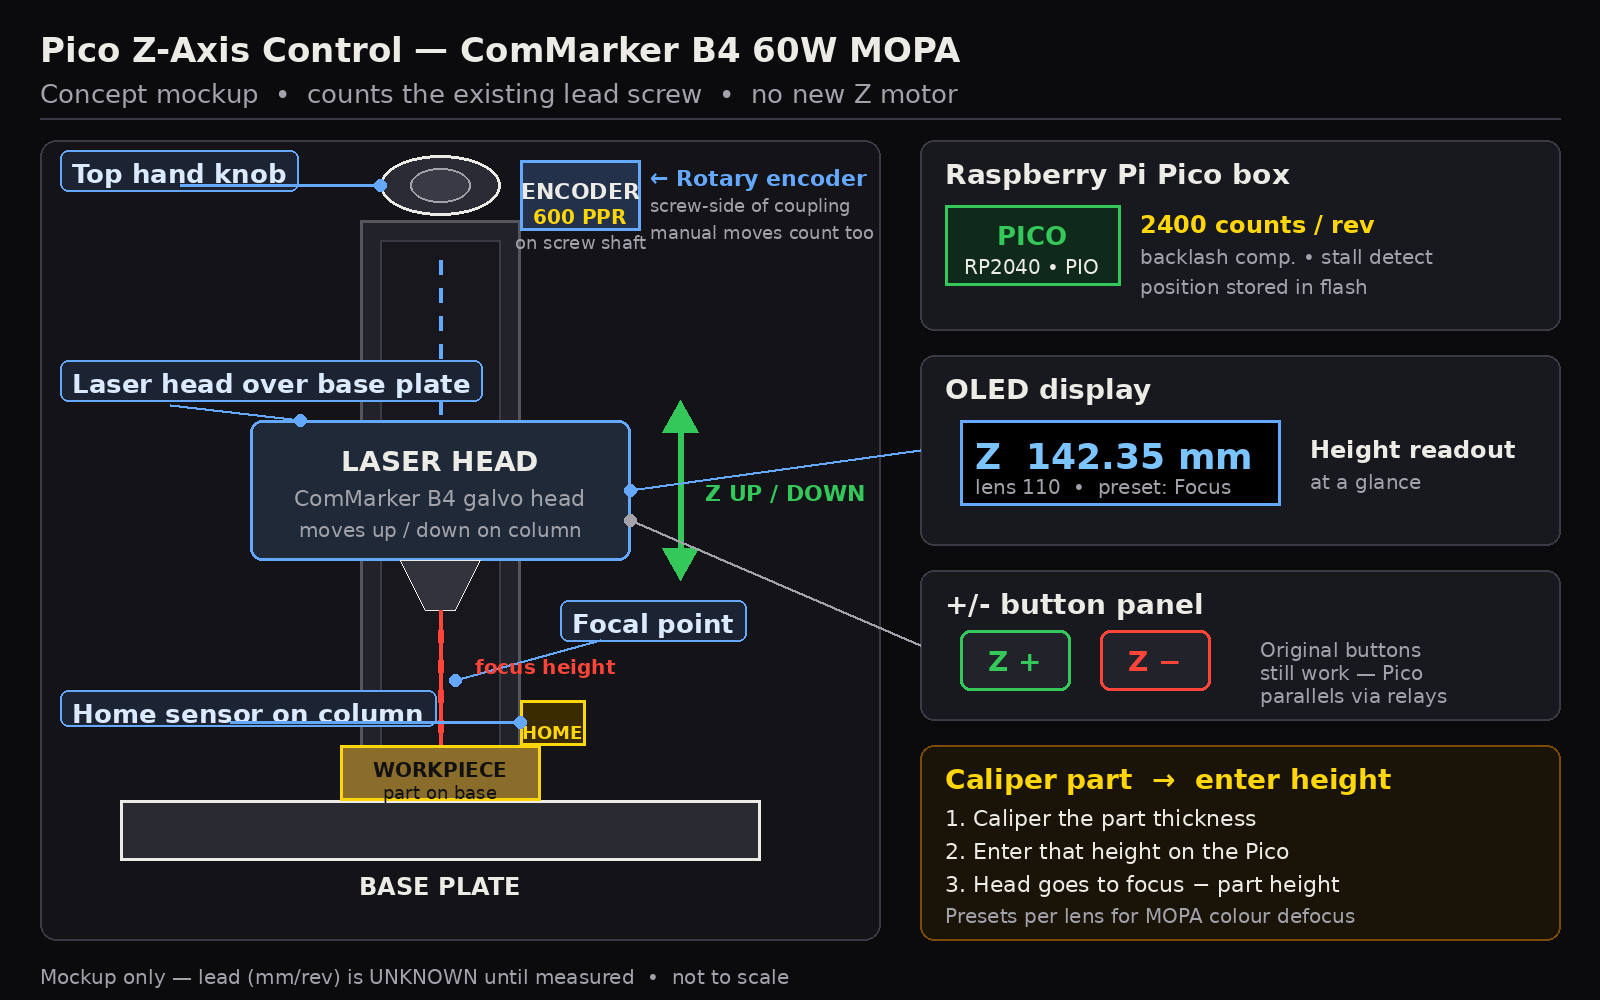
Keep the B4's built-in Z motor, lead screw and hand knob. Count how far that screw actually turns with a 600 PPR quadrature encoder coupled to the screw / top-knob shaft, read it with a Raspberry Pi Pico, and show the height on an OLED. The Pico can then drive the existing + / − buttons through isolated relay contacts to go to a stored height — so focus, and the small defocus offsets used for MOPA colour marking, become repeatable instead of hunted for by eye every time.
1. The problem
The B4 already has a built-in motor and lead screw with +/− buttons, plus a top hand knob for fine focus. What it does not have is any position readout, any go-to height, or any way to return to the same focus — or the same deliberate defocus — twice. Every part change means re-finding focus by eye, and a MOPA colour that worked last week depends on remembering exactly how far out of focus the head was.
2. The idea
- Count the screw, don't replace it. A 600 PPR quadrature encoder is coupled to the lead-screw / top-knob shaft, on the screw side of the motor coupling, so moves made with the hand knob count too — not just motor moves.
- Pico reads it in hardware. A Raspberry Pi Pico (RP2040) decodes quadrature with its PIO blocks: 600 PPR × 4 edges = 2,400 counts per revolution. No counts should be lost to a busy main loop.
- Original buttons keep working. The Pico parallels the existing +/− buttons through isolated relay contacts. Pressing the machine's own buttons still works exactly as before; the Pico just gets to “press” them too.
- OLED height readout (for example
Z 142.35 mm), with the current lens / preset shown alongside. - Position stored in flash, so the height survives power-off — and homing to a sensor on the column to re-establish an absolute reference.
- Backlash compensation: final approach to a target is always made from the same direction, so nut backlash lands on the same side every time.
- Stall detection: if a move is commanded and the encoder does not change, stop — something is jammed, at a limit, or the coupling is slipping.
3. The workflow Hank wants
Caliper a part → enter its height → the head goes to focus.
- Caliper the part and measure its thickness.
- Enter that height on the Pico.
- The Pico moves the head to focus height − part thickness, approaching from the compensated direction.
A preset bank per lens (110 and 200) stores Focus and small ± defocus offsets. Those offsets are exactly what MOPA colour marking plays with, so a colour recipe becomes “this lens, this preset” instead of a remembered knob position — with the actual offset values to be proven by colour tests, not assumed.
4. Honest accuracy note
Counting screw rotations gives very fine resolution — it does not give guaranteed accuracy. The encoder cannot see backlash, nut wear, or a slipping coupling. So, before any number on this page is trusted:
- Measure the lead empirically: 10 full knob turns versus the actual height change on a caliper / dial indicator. The lead (mm/rev) is unknown and unmeasured until that is done — it is not stated anywhere on this page.
- Measure backlash the same way, and set the compensation from the measurement.
- Verify against a dial indicator over real moves, including after direction changes.
- Zero at true focus per lens. Focal length is per-machine and per-lens; the stored zero has to be found on this machine, for each lens.
5. Status / next steps
Concept only — no parts ordered, nothing fitted. Waiting on Hank's measurements and photos:
- Shaft diameter, and a photo with the crank / hand knob removed (decides the encoder coupler).
- The 10-turn lead measurement — or threads per 50 mm plus a direct travel test.
- Photos of the +/− button panel (decides how the relay contacts parallel it).
- Lens list to build presets for: 110 / 200.
Hank uses LightBurn; the Pico Z stays standalone for now — no LightBurn integration is planned or promised.
6. Rough BOM
| Part | Notes | Estimate |
|---|---|---|
| Raspberry Pi Pico (RP2040) | PIO quadrature decoding, flash position store | est. |
| 600 PPR quadrature encoder | 2,400 counts/rev after ×4 decoding | est. |
| Shaft coupler | Size waits on the shaft-diameter measurement | est. |
| OLED display | Height readout, e.g. Z 142.35 mm | est. |
| 2-channel relay module | Isolated contacts paralleling the +/− buttons | est. |
| Home sensor | Column-mounted homing reference | est. |
| Jog control | Entering part height / picking presets | est. |
| Separate 5 V supply | Never powered from the laser PSU | est. |
| Total (rough, US) | ~$65–100 | |
← Back to Laser View home · Mockup image (PNG) · Project add-ons · Projects